Cleanliness failures in a washroom are noticed fast. Unflushed fixtures, odours, empty soap dispensers, wet sink areas, and overflowing trash all shape how people judge the facility, and they usually point to the same root problem: the cleaning program is incomplete, inconsistent, or poorly verified.
A washroom cleaning checklist needs to do more than assign tasks. It needs to set the method. That includes approved chemicals, WHMIS-aligned handling, PPE by task, colour-coded or otherwise separated tools to prevent cross-contamination, required contact times for disinfectants, and a clear sign-off process. In practice, that is the difference between a checklist that looks good on paper and one that holds up during inspections, complaint reviews, and routine operations.
The strongest programs also separate frequencies properly. Daily cleaning keeps fixtures sanitary and consumables available. Weekly detailing targets buildup on walls, partitions, vents, drains, and hard-to-reach edges. Scheduled deep cleaning and restorative work address scale, grout staining, tile deterioration, and persistent odours before they become recurring service calls or health and safety concerns.
Execution matters as much as the task list itself. Teams need a documented process for commercial disinfection and sanitizing protocols, not just a generic wipe-down standard. Supervisors also need a way to confirm completion, log deficiencies, and track repeat issues by location. In many facilities, that now means mobile QA apps with timestamped checklists, photo verification, and corrective-action records.
This checklist is built as an operational tool. It covers what to clean, how to clean it, and why each step matters for compliance, worker safety, user perception, and consistent service quality.
1. Toilet Bowl and Seat Sanitization
Toilet cleaning is where weak washroom programs show up first. If the bowl is stained, the seat is splashed, or the base smells bad, users assume the rest of the facility is neglected too. In shared office and commercial settings, that assumption is usually correct.

Use a Health Canada-approved disinfectant and follow the label contact time. That’s the part many teams rush. Spraying and wiping immediately may improve appearance, but it doesn’t reliably disinfect. In high-use office towers, dental clinics, and school washrooms, the seat, flush handle, partition latch, and exterior bowl all need the same attention as the inside of the bowl.
What actually works
A reliable sequence matters more than speed:
- Pre-check the stall: Flush first, inspect for clogs, paper buildup, and splash marks before applying product.
- Work clean to dirty: Start with the handle, lid, seat, and outer surfaces before finishing with the bowl interior.
- Keep tools separated: Toilet brushes, cloths, and gloves used in the toilet zone shouldn’t move to sinks or counters.
- Respect dwell time: Let the disinfectant sit long enough to do its job before scrubbing and rinsing.
Practical rule: A toilet that looks clean but still smells off usually needs better contact time, better base cleaning, or drain-area attention. More fragrance won’t fix that.
Facilities that need enhanced pathogen control often pair routine cleaning with documented commercial disinfection and sanitizing services, especially after illness events or during seasonal spikes. That isn’t necessary for every shift, but it’s useful when a standard daily wipe-down no longer holds the line.
A short demonstration is often more useful than a written SOP alone.
2. Sink and Faucet Cleaning and Disinfection
Sink zones shape user perception fast. People stand close to them, touch them directly, and notice residue, odour, and empty dispensers within seconds. In offices, clinics, and schools, a stained basin or spotted faucet signals poor control of the whole washroom, even if the rest of the room was serviced properly.
This area also carries a higher process burden than it looks. The task is not just wiping a counter. Staff need the right chemical for the fixture finish, the right PPE for the product in use, and a cleaning sequence that prevents splash-back from the drain and basin onto already cleaned touchpoints. WHMIS labeling, dilution control, and contact-time discipline matter here because sink areas combine hygiene risk with high visibility.
Soap availability should be checked during the same pass, as noted earlier. A clean basin with an empty dispenser is an operational miss, not a finished job.
Better technique for fixtures and counters
Use a fresh microfibre cloth and start with the least soiled upper surfaces. Apply cleaner to the cloth when practical, especially around faucet bases and backsplash joints, where overspray can leave residue or damage some finishes over time. On brushed nickel, coated fixtures, or stone counters, a neutral cleaner is usually the safer choice. On chrome, remove soap film and mineral residue first, then dry thoroughly so the finish does not spot.
A practical sequence looks like this:
- Check the area before cleaning: Look for leaks, loose faucets, slow drainage, cracked caulking, and empty or contaminated dispensers.
- Clean high-touch points first: Wipe faucet handles, spouts, soap dispenser actuators, and counter edges with the correct disinfectant and full dwell time.
- Address the basin and drain detail: Scrub around the drain flange, overflow opening, and faucet base where biofilm, scale, and odour tend to build up.
- Rinse or remove residue as required by the product label: Some disinfectants and descalers need a follow-up wipe to prevent buildup or surface damage.
- Dry and inspect: Dry metal and countertop surfaces to control spotting, then confirm the sink drains properly and the dispenser works.

The trade-off is straightforward. Heavy descaling improves appearance and flow, but repeated use of aggressive product can shorten the life of specialty finishes, seals, and grout lines around the sink. Teams need a standard daily method and a separate periodic restoration protocol for scale.
For quality assurance, this is one of the easiest washroom tasks to score in a mobile inspection app. Supervisors can verify dispenser status, drain condition, fixture dryness, and visible residue with a quick photo check. That turns a simple checklist item into a tracked standard tied to safety, presentation, and maintenance reporting.
3. Mirror and Glass Surface Cleaning
Mirror cleaning is mostly about discipline. Overspray, wrong cloth choice, and poor sequence create more problems than the glass itself. In corporate headquarters and professional clinics, streaked mirrors are often the first thing a visitor notices because they amplify every overhead light and every smudge.
Apply glass cleaner to the cloth instead of directly to the mirror when possible. That reduces drips onto counters, backsplash joints, and dispenser tops. It also prevents cleaner from running into edges where backing can degrade over time.
How to avoid streaks
Most streaking comes from one of three issues: too much product, a dirty cloth, or trying to clean glass after nearby wet work has already started throwing residue into the air. Clean mirrors after dusty tasks but before floor mopping finishes the room with humidity.
Clean in overlapping top-to-bottom passes. Then check the mirror from an angle, not straight on. That’s where missed film usually shows up.
In the GTA, hard water residue can make mirror work feel repetitive because nearby sink splash creates a light mineral haze. Distilled water for the final wipe can help in premium spaces, but it’s usually unnecessary for standard office washrooms if daily maintenance is consistent.
If the mirror is repeatedly streaky, the problem is often upstream. Aerosolized cleaner from adjacent fixtures, overused cloths, or poor ventilation can keep redepositing residue. In those cases, changing process beats changing product.
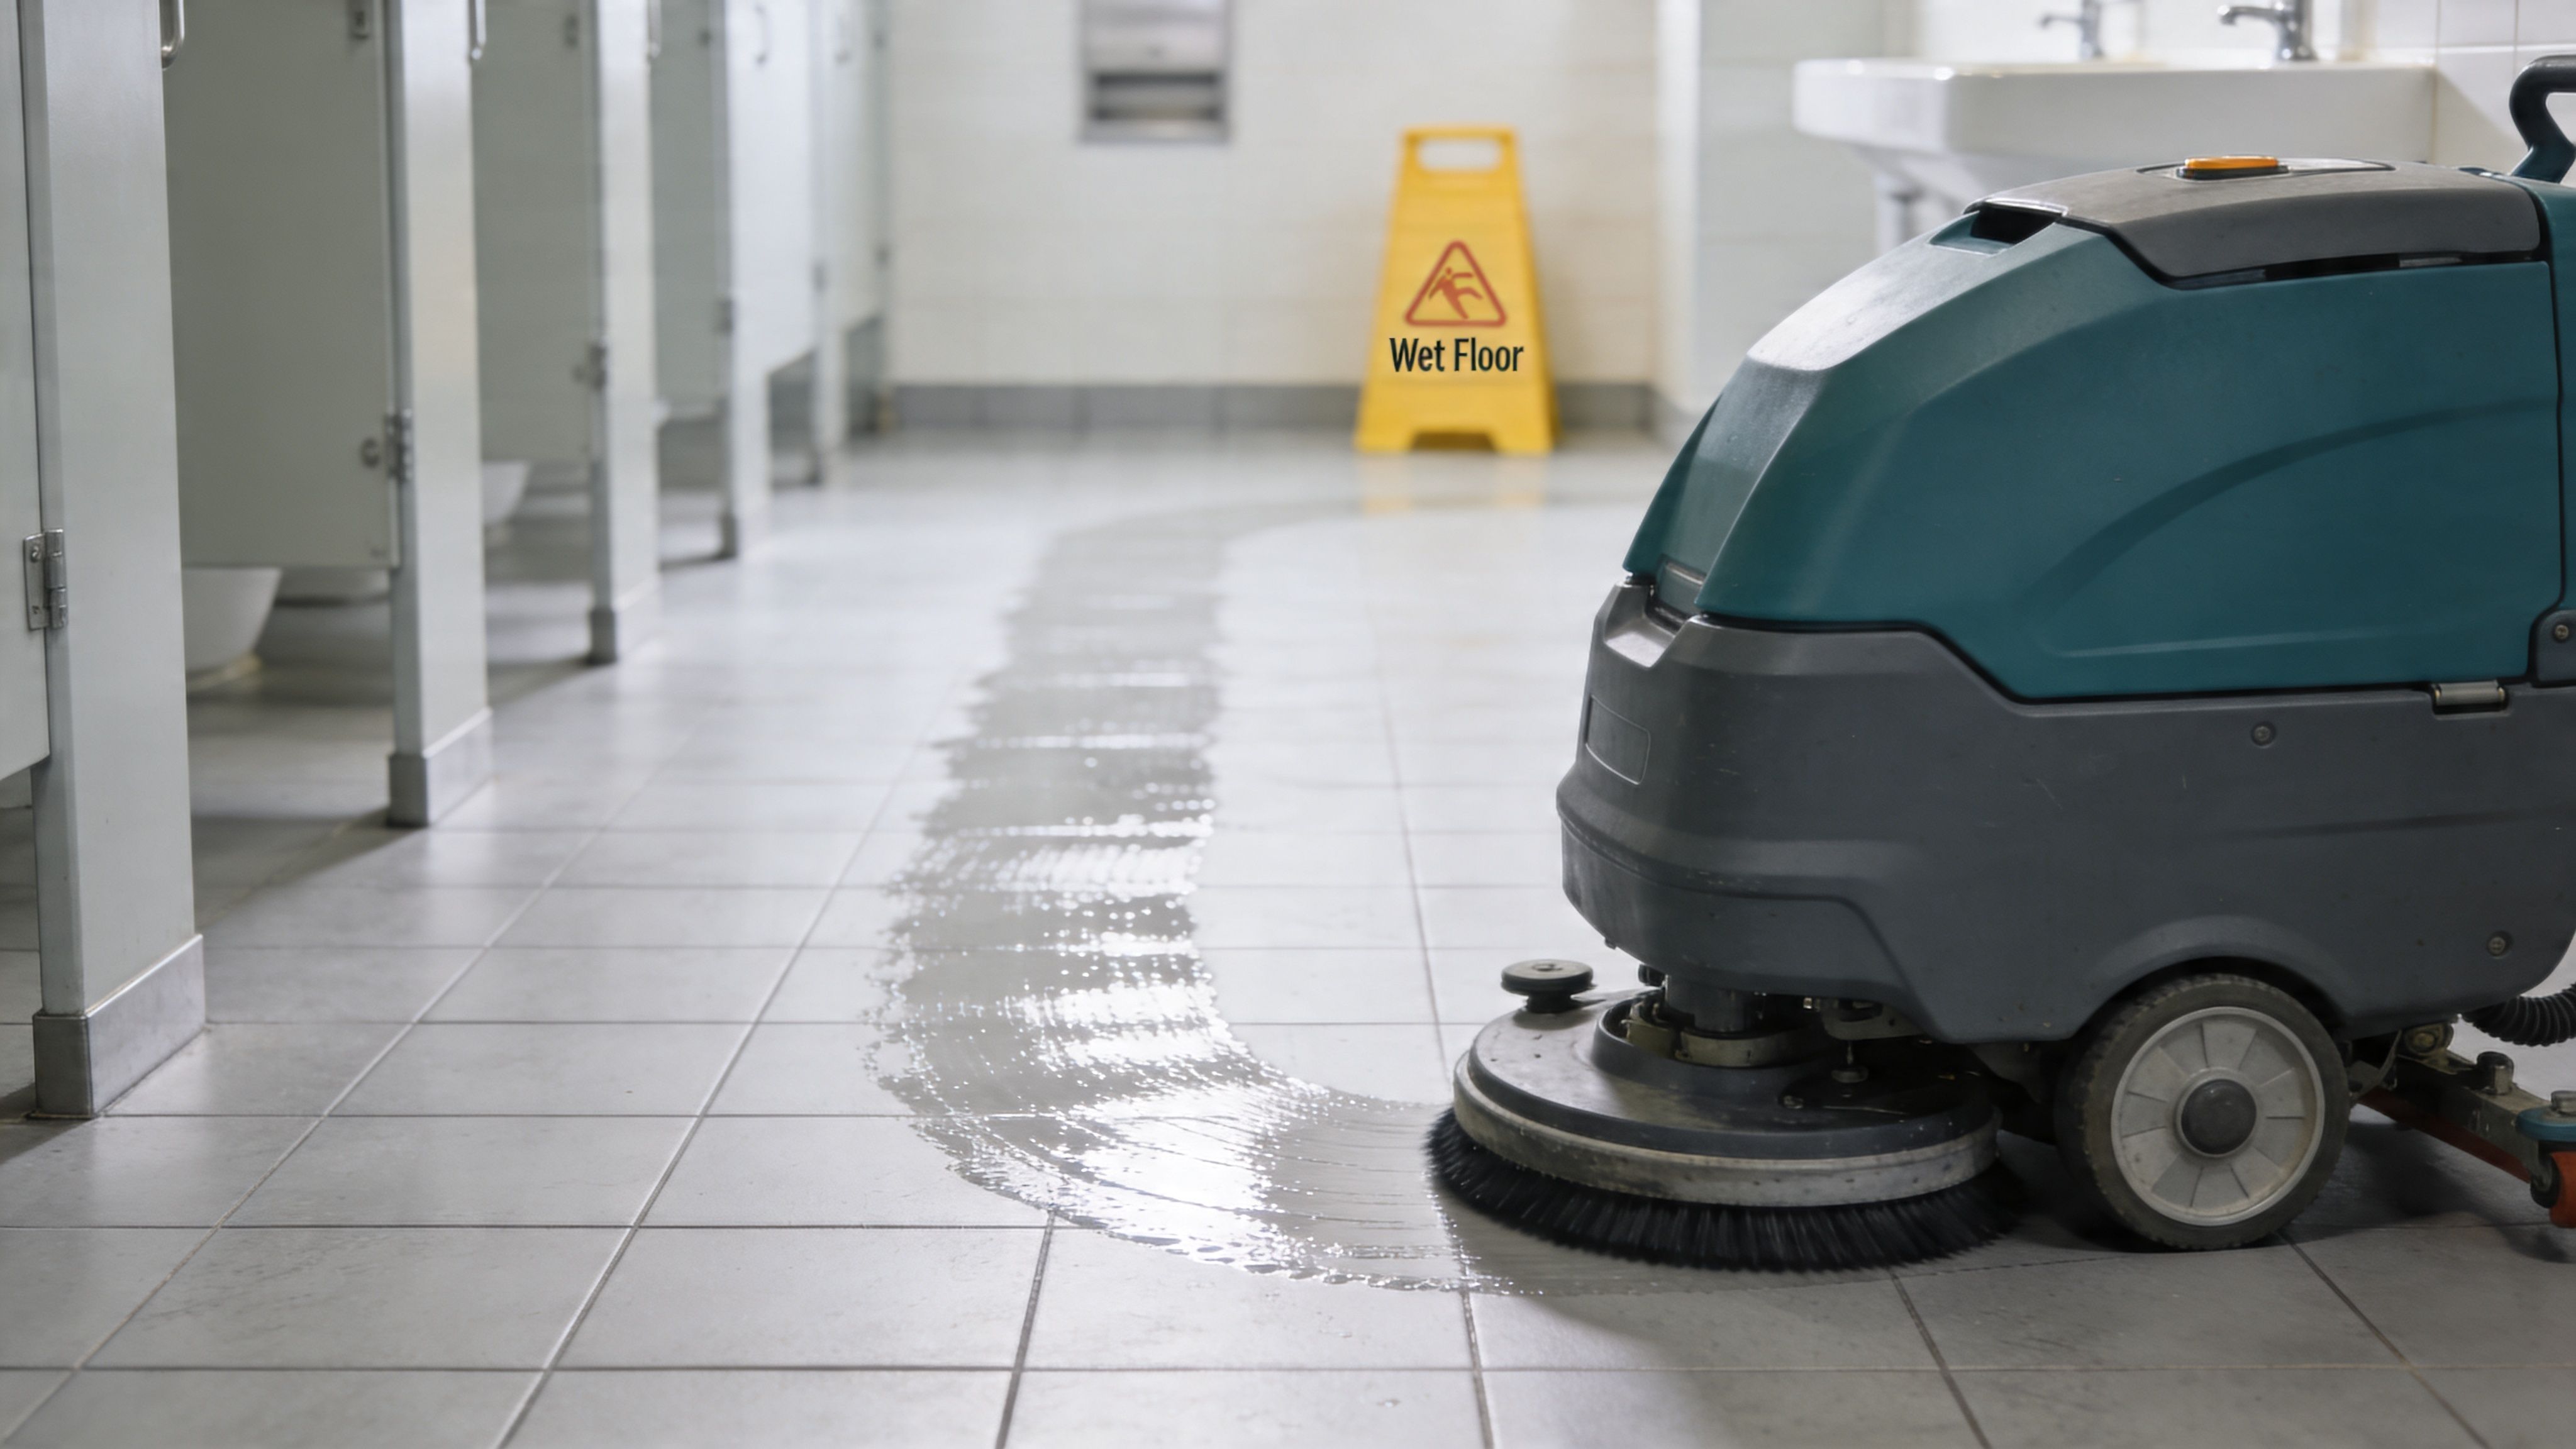
4. Floor Scrubbing and Disinfection
Slip incidents often start with routine neglect. On washroom floors, the visible problem is usually paper or tracked moisture. The bigger problem is contaminated residue in corners, grout lines, and around fixtures where traffic and splash meet.
Floor care has to cover three things at once: soil removal, disinfection, and safe drying. If a team only mops for appearance, the floor can still carry urine residue, cleaner film, and enough moisture to create a liability issue. That is why floor procedures belong in the same checklist as PPE, product dilution, contact time, and signage placement.
Start with dry removal. Paper scraps, hair, and grit should be vacuumed or swept before any liquid is applied. Mopping over debris pushes slurry into grout joints and leaves edges dirty even when the center of the room looks clean.
Then match the method to the surface. Tile can usually tolerate more mechanical action than vinyl. Sealed concrete may need a different cleaner and a tighter rinse standard to avoid haze. Staff should confirm the SDS, use WHMIS-labelled products, wear the required gloves and footwear, and never mix disinfectants with descalers or other acidic products.
Safe floor procedure
A good floor routine is controlled, not rushed.
- Post wet floor signs before starting: Place them where users will see them before they enter the hazard area.
- Use the correct dilution and dwell time: A disinfectant that is over-diluted or wiped up too early does not do the job.
- Control moisture during mopping or scrubbing: Excess water migrates under partitions, around toilet bases, and into grout.
- Work edges and splash zones deliberately: Behind toilets, under urinals, and along wall lines usually hold the heaviest residue.
- Rinse if the product requires it: Some chemistries leave film that attracts soil or makes the floor slippery.
- Verify drying before reopening: Fast visual checks prevent immediate re-soiling and reduce slip complaints.
Microfibre flat mops work well for daily maintenance because they hold less water and are easier to change out between washrooms. Auto-scrubbers make sense in larger facilities, but only if the pad, brush pressure, and recovery are appropriate for the floor finish and room layout. In smaller washrooms with tight partitions, manual detail work still matters because machines miss the areas where odour and buildup tend to start.
Quality control should not stop at "floor mopped." Supervisors should check for residue at edges, confirm the floor dried without puddling, and document completion in a mobile QA system with timestamps or photo verification. That turns a checklist into an auditable process. It also helps identify repeat problem areas, such as chronic sink splash zones or poor drainage near urinals.
For facilities reviewing equipment or surface-care methods, outside references on professional tile cleaning services can help compare scrubber options and tile-specific cleaning approaches. The final protocol still needs to match your washroom's traffic, finish type, chemical program, and compliance requirements.
5. Urinal Cleaning and Descaling
Urinals generate a disproportionate share of washroom odour complaints. In practice, one neglected urinal can affect how users judge the entire room, even when the rest of the fixtures were cleaned properly.
Urinals need their own procedure because the soil load is different. Urine salts, mineral scale, biofilm, and splash residue build up in the trap area, around the drain screen, under the rim, and on nearby surfaces. A standard disinfectant may sanitize the surface but still leave the deposits that hold odour. That is why teams need both the right chemistry and the right sequence.
Start with PPE and product control. Staff should confirm WHMIS labels, use the manufacturer-approved dilution, and make sure ventilation is adequate before applying any descaler. Acid products can be effective on scale, but they also increase risk if mixed improperly or used on incompatible finishes. For that reason, I recommend separating descaling from routine disinfection in the checklist so technicians know which step they are performing and supervisors can verify it in the QA record.
Clean the fixture beyond the visible bowl. The lip, flush spreader, drain insert, partition edges, wall splash zone, and floor directly below the urinal all need attention.
A practical urinal protocol usually includes:
- Apply urinal-safe descaler to scale-prone areas and allow proper dwell time.
- Remove and clean the drain screen or insert if the fixture design permits it.
- Agitate under rims, around the outlet, and at seams where residue collects.
- Rinse or flush according to product directions.
- Follow with the site-approved disinfectant if the descaler is not also a disinfectant approved for that use.
- Wipe adjacent partitions, walls, and exposed plumbing where splashback settles.
- Document completion in the mobile inspection app, especially if heavy buildup, slow drainage, or recurring odour was found.
The why matters as much as the task itself. Descaling protects flush performance, reduces persistent odour, and helps avoid premature fixture replacement caused by blocked cartridges, stained porcelain, or corrosion around fittings. It also protects perception. Occupants rarely distinguish between a dirty urinal and a poorly managed facility.
Supply choice affects results too. Cheap chemicals, the wrong screens, or inconsistent washroom supplies often create more labour, not less, because staff have to repeat work on the same fixture.
If a urinal smells acceptable right after service but fails again soon after, inspect the drain insert, trap area, grout at the base, and the wall surface beside the fixture. That pattern usually points to residue left in place, not a lack of fragrance or a weak final wipe.
6. Dispensers and Accessory Restocking and Cleaning
Empty soap, jammed paper, and overflowing waste units undermine the whole washroom program fast. Users read those failures as poor hygiene, even when the fixtures and floors were cleaned properly.
Dispensers and accessories need a service standard, not a quick refill. That standard should cover cleaning, restocking, function checks, and documentation. It should also match WHMIS requirements, approved products, and the PPE the task calls for, especially when staff are cleaning around splash residue or handling sanitary waste units.
The equipment choice matters. Touchless dispensers can reduce hand contact, but they add battery checks, sensor testing, and refill compatibility issues. Manual units often hold up better in high-abuse sites, though they create more contact points and need more frequent exterior wiping. The right setup depends on traffic volume, vandalism risk, and how reliably the site can support preventive maintenance.
A practical routine includes:
- Open and inspect every dispenser on every visit: Do not estimate stock levels from the outside.
- Clean contact points and product openings: Wipe buttons, levers, covers, nozzles, and pull areas to remove residue and reduce cross-contact.
- Confirm the unit works: Test soap output, paper feed, battery status, and sensor response where applicable.
- Restock to par levels: Refill before units run low, not after complaints start.
- Check accessory units too: Feminine hygiene receptacles, toilet seat cover dispensers, air freshener units, grab bars, and hand dryers all affect user perception and service quality.
- Record issues in the QA system: A mobile app should capture stockouts, broken locks, missing keys, battery failures, and repeat service calls by location.
Waste capacity deserves the same attention as refill levels. Overflow usually points to poor sizing, weak service frequency, or a mismatch between peak traffic and the cleaning schedule. In schools, transit sites, and multi-tenant offices, I usually recommend reviewing bin size and restocking frequency together because one problem often drives the other.
Supply purchasing also affects labour. Low-grade paper jams more often. Poorly fitted refill cartridges leak. Incompatible soap can clog pumps or leave residue on sink decks and dispenser fronts. Teams sourcing washroom supplies should buy for dispenser compatibility, durability, and storage efficiency first, then appearance.
This part of the checklist protects more than presentation. It supports hand hygiene, reduces complaints, helps with audit readiness, and gives supervisors a clear way to verify whether service was completed.
7. Wall, Door, and Frame Cleaning
Walls and doors tell the truth about whether a washroom is being maintained or just reset visually. Smudged push plates, dirty partition edges, and splash marks around latches are easy to miss during a rushed shift. Users don’t miss them.
Door handles, locks, and push surfaces should be disinfected daily in shared facilities. Spot cleaning walls is usually sufficient for routine service, but the lower sections near sinks, hand dryers, and waste bins often need more regular attention than teams expect. In schools and high-traffic office settings, finger marks build up faster than most standard schedules account for.
Often missed but highly visible
Baseboards, door frames, and stall edges create a “border effect.” If they’re dusty or stained, the whole room feels older and less sanitary. Cleaners should use a damp microfibre cloth rather than saturating painted surfaces with spray.
A practical sequence is straightforward:
- Hit high-touch hardware first: Handles, latches, and push plates come before broader surface wiping.
- Spot clean at eye level and below: That’s where handprints and splash marks are most visible.
- Watch for mildew signals: Peeling paint, soft caulking, or dark spotting should trigger maintenance review.
- Include frames and corners weekly: These are easy to skip and hard to ignore once dirty.
There’s also a compliance angle. Ontario’s Bill 168 framework requires attention to workplace violence and harassment risks, including isolated areas such as washrooms. Market background summarizing a 2023 Ontario WSIB report notes 1,200+ workplace violence incidents in GTA offices and schools, with 15% linked to poor facility maintenance including unclean washrooms, as discussed in washroom checklist commentary related to Bill 168. Cleaning teams don’t solve those risks alone, but daily hazard observations around doors, locks, sightlines, and floor safety can support a broader facility response.
8. Ventilation and Exhaust System Maintenance
Poor air movement is one of the fastest ways to lose control of a washroom, even when surface cleaning is being done properly. If odour returns soon after service, mirrors stay fogged, or ceiling corners show repeated spotting, the problem often sits in the exhaust path, not in the last cleaning round.
Ventilation affects more than comfort. It affects drying time, mould risk, chemical dwell performance, and how clean the room feels to users. In practice, I treat vent checks as part of the cleaning system, not separate from it, because a washroom that stays damp will consume more labour and generate more complaints.
Front-line staff should only handle what falls within their training and site procedure. That means visual inspection, safe dust removal from accessible grilles, and accurate reporting. Any work beyond that should be assigned to maintenance or an HVAC contractor under the facility's lockout, access, and safety rules.
What staff should inspect during routine service
A useful vent check is brief and specific:
- Inspect accessible exhaust covers for dust buildup: Loaded grilles restrict airflow and can drop debris onto nearby walls or partitions.
- Check for moisture staining: Discoloration around the grille or on the ceiling can point to poor extraction, condensation, or a duct issue.
- Confirm the fan appears to be operating: Unusual noise, weak pull, or silence should be logged for maintenance follow-up.
- Record persistent odour after cleaning: Repeated complaints usually indicate an airflow, plumbing, or hidden moisture issue rather than missed wipe-downs.
- Use the right PPE and chemistry: Staff cleaning accessible vent covers should follow WHMIS instructions, avoid over-wetting electrical areas, and use only approved tools and products for that task.
Execution matters. If staff spray chemical directly into a grille, over-wet the surrounding ceiling, or skip reporting because the room "looks fine," the checklist fails at the protocol level. Good washroom programs connect the task, the method, and the escalation path.
Digital QA helps here. Vent checks are easy to miss on paper, especially on busy shifts or in low-visibility corners. A mobile checklist with time stamps, photos, and exception logging gives supervisors proof that the inspection happened and gives maintenance a cleaner handoff when airflow issues need corrective work.
9. Grout and Tile Sealing or Resealing
A large share of washroom complaints that staff call "cleaning issues" are really surface condition issues. Grout is usually the reason. Tile can look acceptable under overhead lighting while open grout joints hold moisture, body soil, cleaner residue, and odour that routine mopping does not remove.
That matters operationally. If grout stays porous or cracked, teams spend more time scrubbing, use stronger chemistry more often, and still deliver inconsistent results.
Grout and tile care belongs on a scheduled maintenance plan, not a vague "deep clean as needed" note. As noted earlier, moderate-traffic sites can often handle this work during annual or semiannual deep service, while high-use schools, industrial facilities, and other heavy-traffic buildings usually need more frequent assessment. The trigger should be condition, not just calendar date.
Treat grout as a maintenance item, not a cosmetic detail
Sealing and resealing protect the finish and reduce how quickly soils bond to the surface. That improves daily cleanability, shortens labour time, and lowers the temptation to overuse aggressive products that can damage grout, strip sealers, or create indoor air concerns in enclosed washrooms.
The trade-off is simple. Resealing takes planned downtime, correct surface prep, and a product compatible with the tile and grout type. Skipping it often costs more later through repeat call-backs, heavier restoration work, and faster surface deterioration.
A practical inspection standard includes:
- Check for darkened or uneven grout lines: Persistent discoloration after cleaning usually points to absorption, failed sealer, or embedded soil.
- Look for cracking, pinholes, or missing grout: These defects allow water intrusion and make sanitation harder.
- Test for recurring odour at floor-wall joints and around fixtures: Chronic odour in these areas often survives routine cleaning because the problem sits in porous or damaged material.
- Confirm the chemistry and tools match the task: Staff should follow WHMIS instructions, required PPE, dwell times, and dilution standards, especially when using acidic or alkaline restorers.
- Escalate restoration needs clearly: If scrubbing no longer changes the result, log it for resealing, repair, or replacement rather than repeating the same unproductive task.
Surface shine can mislead. A washroom can pass a quick visual check and still fail on odour control and cleanability because the grout system has broken down.
This is also where digital QA adds value. A mobile checklist can prompt periodic grout inspections, capture photos of failed joints or staining, and create a clear handoff from cleaning staff to maintenance or specialty contractors. That turns grout care into a tracked asset-protection task tied to compliance, safety, and user perception, not just another line on a cleaning sheet.
10. Trash and Waste Removal with Sanitation
A full waste bin changes how people judge the entire washroom within seconds. It also creates one of the most common gaps between a room that looks serviced and a room that is being managed to a sanitary standard.
Waste removal is not just a porter task. It is a contamination-control task tied to odour, touchpoint hygiene, pest prevention, and staff safety. If liners tear, feminine hygiene receptacles leak, or bags are dragged against doors and walls during removal, the problem spreads past the bin and into the rest of the space.
The standard should match traffic, fixture count, and waste type. High-use washrooms often need multiple checks per day. Lower-volume offices may be fine with daily service, but only if bin capacity is adequate and the route includes inspection, not just bag removal.
Waste handling that protects staff and users
Staff need a clear method, not just a reminder to "take out the trash." Gloves are the minimum PPE. Teams also need WHMIS-aligned procedures for product use, tied-off bag handling, safe response to sharps or suspicious waste if encountered, and hand hygiene after every removal cycle.
Use this operating standard:
- Empty bins before they reach capacity: Overflow signals poor control and increases hand contact with waste.
- Replace liners on every service: Reusing a partially soiled liner saves seconds and creates odour, leakage, and appearance problems.
- Clean and disinfect the bin itself: Interior walls, rims, lids, and touchpoints collect residue even with regular liner changes.
- Handle special waste by site protocol: Clinics, childcare facilities, and industrial sites may require separate streams, containers, and escalation steps.
- Check the area around the bin: Missed debris, liquid at the base, and splash marks on nearby partitions quickly undermine the rest of the cleaning work.
Product choice matters, especially in enclosed washrooms where harsh residue or strong fragrance can create complaints. Execution matters more. A properly diluted, low-odour disinfectant used with the right contact time will usually outperform a stronger product applied inconsistently.
This task also benefits from digital QA. Mobile checklists can require staff to log waste removal times, record overflow incidents, photograph damaged receptacles, and flag recurring problem locations for route changes or bin upgrades. That turns waste service into a tracked operational control tied to compliance, safety, and user perception, rather than a basic housekeeping line item.
10-Item Washroom Cleaning Checklist Comparison
| Task | Implementation Complexity 🔄 | Resource Requirements ⚡ | Expected Outcomes ⭐ | Ideal Use Cases 📊 | Key Advantages & Quick Tip 💡 |
|---|
| Toilet Bowl and Seat Sanitization | Medium 🔄, requires contact time and PPE | Hospital-grade disinfectant, brushes, gloves, PPE | ⭐⭐⭐⭐⭐, high pathogen reduction and odor control | Clinics, high-traffic offices, schools | Prevents cross-contamination; tip: allow full contact time before scrubbing. |
| Sink and Faucet Cleaning and Disinfection | Medium 🔄, attention to finishes and drains | Descalers, disinfectant, microfiber, pH-neutral cleaners | ⭐⭐⭐⭐, removes biofilm and improves appearance | Dental offices, professional suites, busy offices | Reduces bacteria on high-touch points; tip: clean handles first, fixtures second. |
| Mirror and Glass Surface Cleaning | Low 🔄, technique-driven | Streak-free glass cleaner, microfiber or squeegee | ⭐⭐⭐⭐, visible cleanliness boosts perception | Corporate HQs, clinics, upscale facilities | Enhances perceived cleanliness; tip: clean top-to-bottom with distilled water for final wipe. |
| Floor Scrubbing and Disinfection | High 🔄, wet hazards, equipment choices | Floor scrubber or mops, floor disinfectant, signage | ⭐⭐⭐⭐, reduces slips, biofilm, and pathogens | Warehouses, childcare centres, healthcare-adjacent offices | Lowers slip-and-fall risk; tip: use microfiber mops and allow full drying time. |
| Urinal Cleaning and Descaling | High 🔄, acid handling & ventilation needed | Acid descalers, brushes, enzyme treatments, PPE | ⭐⭐⭐⭐, strong odor and mineral removal when done correctly | Large office complexes, manufacturing sites, schools | Eliminates persistent odors; tip: use urinal-specific descalers and ensure ventilation. |
| Dispensers and Accessory Restocking & Cleaning | Low-Medium 🔄, regular cycles and inventory | Disinfectant, refills (soap, paper), liners, sensor maintenance | ⭐⭐⭐⭐, reduces touch transmission and supply issues | Offices, healthcare, childcare, public restrooms | Ensures supply availability and hygiene; tip: implement touchless dispensers and inventory tracking. |
| Wall, Door, and Frame Cleaning | Low-Medium 🔄, requires paint-safe methods | Diluted cleaners, disinfectant, microfiber, anti-fungal where needed | ⭐⭐⭐⭐, removes high-touch contamination and improves appearance | Law firms, clinics, corporate washrooms | Addresses overlooked infection points; tip: disinfect handles first (top-to-bottom). |
| Ventilation and Exhaust System Maintenance | High 🔄, may need HVAC specialists | Ladders, brushes, HVAC tools, possible contractor services | ⭐⭐⭐⭐, controls humidity, mold, and air quality | Multi-story offices, industrial facilities, childcare centres | Prevents mold and improves air quality; tip: schedule inspections every 3–12 months. |
| Grout and Tile Sealing / Resealing | High 🔄, downtime and curing required | Deep cleaners, grout tools, sealers (penetrating/membrane), curing time | ⭐⭐⭐⭐⭐, long-term mold prevention and easier cleaning | Healthcare, high-moisture facilities, older tiled sites | Extends floor life and resists stains; tip: reseal every 2–3 years and allow full cure. |
| Trash and Waste Removal with Sanitation | Low-Medium 🔄, biohazard procedures for some waste | Liners, disinfectant, PPE, biohazard containers for sharps | ⭐⭐⭐⭐, prevents odor, pests, and regulatory issues | Clinics, large offices, manufacturing sites | Reduces contamination and regulatory risk; tip: segregate waste and sanitize bins weekly. |
From Checklist to System Ensuring Consistent Quality
Poor washroom standards are one of the fastest ways to generate complaints. In practice, the problem is rarely the absence of a checklist. It is a checklist that lists tasks without defining method, product, safety controls, and proof of completion.
A workable washroom cleaning checklist needs three layers. First, the task itself. Second, the protocol, including product dilution, contact time, colour-coded tools, PPE, and WHMIS handling requirements. Third, the reason the task matters, whether that is infection control, slip prevention, odour control, appearance, or audit readiness. Without those layers, staff are left to improvise, and quality starts to vary by shift, building, and crew experience.
Frequency also needs to match traffic and risk. Daily service covers the obvious touchpoints and visible soil. Weekly work addresses buildup that affects hygiene and presentation but does not always show up in a quick inspection. Periodic deep cleaning deals with scale, staining, drain odours, grout deterioration, and fixture wear before they turn into repairs or tenant complaints. That structure helps teams use labour where it has the most impact instead of treating every visit the same.
Execution standards matter as much as the list itself. Staff need clear rules on which disinfectants are approved for each surface, where stronger chemistry creates damage risk, when eye protection or gloves are required, and how to isolate a washroom if the floor is unsafe or a fixture has failed. A checklist should also tell the cleaner what to report, not just what to wipe. Leaks, loose grab bars, empty dispensers, blocked drains, and ventilation failures are operations issues with cleaning consequences.
Verification closes the gap between assigned work and completed work.
The better programs I see use mobile inspection forms, time stamps, photos, deficiency flags, and supervisor review to confirm that the standard was met. That does not replace training or site leadership. It gives facility managers an audit trail, helps catch repeat failures, and makes contractor performance easier to measure across multiple sites. For regulated or high-complaint environments, some teams also add objective checks such as ATP testing or formal inspections after deep cleaning, but that level of validation should match the facility’s risk profile and budget.
There is a real trade-off here. A short checklist saves minutes but often pushes missed work into the next visit. An oversized checklist looks thorough on paper and often leads to pencil-whipping, rushed disinfection, or skipped reporting. The right system is specific enough to produce consistent results and lean enough to finish properly within the service window.
Facility managers should test any cleaning program with operational questions. Are product lists current and matched to the surfaces in the washroom? Is WHMIS training documented and current for every worker assigned to the site? Are contact times realistic within the scheduled labour? How are after-hours deficiencies reported? What proof exists that the work was completed to standard when no supervisor is onsite?
That is the difference between a checklist and a system. A checklist assigns tasks. A system sets the method, records completion, flags exceptions, and gives management a way to verify performance over time. Use this washroom cleaning checklist as a baseline, then compare providers on training records, QA process, reporting discipline, and how well they handle exceptions under real site conditions.
Further Reading
If a facility needs outside support, Arelli Cleaning is one GTA option to include when comparing commercial cleaning providers.


.webp)