A facility can have new lamps, a sound electrical system, and a clean-looking ceiling line, yet still feel dull. That usually shows up first as complaints no one logs formally. Staff mention eye strain. A reception area looks flat in the late afternoon. A warehouse aisle feels shadowed even though nothing is technically broken.
In practice, that often points to one of the most overlooked maintenance items in the building. Light fixture cleaning sits between housekeeping, safety, energy management, and preventive maintenance. When it's treated as a cosmetic extra, facilities absorb the cost in reduced visibility, avoidable service calls, and inconsistent lighting conditions that could have been corrected with a documented routine.
Beyond Brightness The Operational Impact of Clean Light Fixtures
A site can pass a quick visual check and still be underlit where it matters. The usual result is not an immediate failure. It shows up as slower work, more complaints about dim areas, and lamp replacements that do not solve the problem.
Dirty fixtures reduce delivered light in the space. Dust on lenses, residue on diffusers, and film on reflectors block and scatter output before it reaches the work surface. The fixture may be energized and the lamp may be within service life, but the building still gets less usable illumination than the system was designed to provide.
That gap has operating cost attached to it.
In commercial buildings, reduced fixture output often leads to compensating behavior. Staff switch on adjacent zones earlier, leave lights on longer, or request relamping in areas where the problem is contamination. Those responses increase labor and energy use without correcting the underlying maintenance condition. In facilities with long operating hours, that pattern can subtly affect the monthly utility bill and the maintenance budget at the same time.
The safety side is just as practical. Light levels that drift down over time make aisles, stairs, storage racks, washrooms, and task areas less readable. In offices, that means more eye strain and poorer visual comfort. In warehouses, schools, healthcare spaces, and back-of-house corridors, it affects hazard recognition, label reading, and safe movement. A fixture that is only partially obstructed can still create uneven distribution and shadows, which is often the actual complaint.
Why this belongs in facility operations
Fixture cleaning should be managed as a performance task. If the surface condition of the fixture is reducing output, the lighting system is not meeting its intended function, even though no component has technically failed.
Maintenance programs frequently lose efficiency. Lamp changes, janitorial cleaning, and complaint response get handled as separate workflows. The result is repeat work. One team replaces lamps, another logs a lighting complaint, and no one addresses the dirt load on the fixture itself. A short inspection of the lens, reflector, housing, and surrounding ceiling area usually shows whether the problem is electrical or maintenance-related.
Practical rule: If a room still feels dim after relamping, inspect the fixture for dust, residue, yellowed diffusers, and blocked reflectors before opening a work order for electrical troubleshooting.
The business effects facility teams actually see
The operational impact usually appears in four areas:
- Higher energy use: Occupants and supervisors compensate for weak lighting by adding run time or turning on more fixtures than the task requires.
- Visibility and safety risk: Reduced and uneven light makes circulation paths and work areas harder to read.
- Avoidable maintenance spend: Working lamps get replaced early when the actual loss is coming from dirty fixture surfaces.
- Appearance tied to standards: Lobbies, meeting rooms, reception areas, and customer-facing spaces look poorly maintained faster than the rest of the room.
Clean fixtures support design light levels, help control run hours, and reduce false lamp failures. From an operations standpoint, that makes fixture cleaning part of preventive maintenance and building performance, not a cosmetic extra.
Essential Safety Protocols and Preparations
Light fixture cleaning starts with hazard control. The job combines electrical equipment, work at height, fragile components, and cleaning chemistry. A rushed setup usually creates the preventable problems. Broken diffusers, wet sockets, unstable ladders, and exposed work areas.
Before any task begins, the site should be prepared as if it were any other controlled maintenance activity.
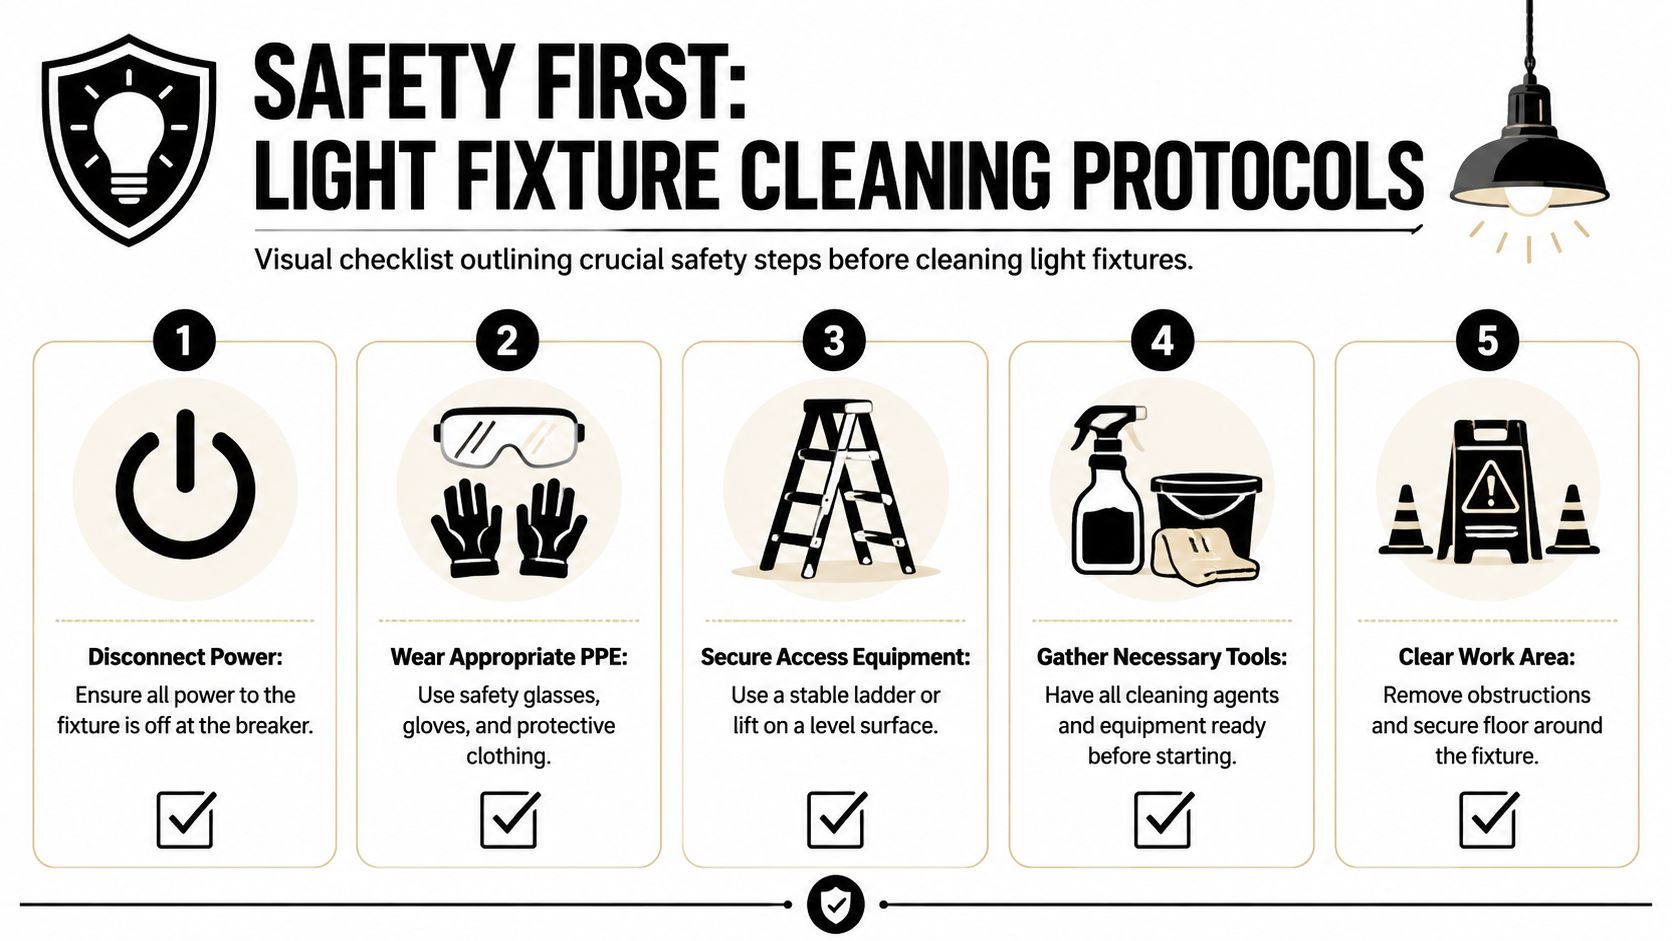
Pre-task controls
The first requirement is power isolation. Manufacturer guidance for fixture care says to turn off power before cleaning, especially where covers, shades, or internal parts are being removed. In a commercial environment, that should mean isolating the circuit at the breaker and applying the site's lockout and tagout procedure where required.
The second requirement is access control. If the fixture can't be reached from the floor with approved extension tools, the worker needs stable access equipment on a level surface. The surrounding floor area should be cleared so no one walks under the work zone while glass, dust, or tools are overhead.
Shut off power before touching the fixture, not just before disassembly. That one step removes the most obvious avoidable risk.
PPE and approved materials
The right PPE depends on location and soil load, but a basic setup is straightforward:
- Eye protection: Safety glasses or goggles protect against falling dust and splashes.
- Hand protection: Gloves help with grime, sharp edges, and delicate glass handling.
- Footwear: Non-slip footwear supports ladder stability and safe movement in service areas.
- Protective clothing: Useful in dusty ceilings, warehouse environments, and above-ceiling access zones.
Cleaning materials matter just as much as PPE. Manufacturer-aligned guidance favours low-risk, non-abrasive practices. Glass shades should be removed where possible, hand-washed with mild detergent, and dried thoroughly before reinstallation. Water should never be allowed into electrical parts, and abrasive pads should never be used on lenses, trim, or decorative finishes.
Safety checklist before work begins
Facility teams should confirm all of the following before starting:
- Power is isolated: The correct breaker has been identified and switched off.
- The fixture has cooled: Hot lamps, housings, and enclosed fittings need time before handling.
- The work area is secured: Furniture, floor traffic, and nearby equipment have been managed.
- Access equipment is suitable: Ladder or lift selection matches fixture height and clearance.
- Tools are ready: Cloths, detergent, collection bags, and replacement parts are on hand.
- Drying space is available: Removed lenses and glass need a clean, protected area for drying.
Where teams get into trouble is usually not the cleaning step itself. It's poor preparation. Safe light fixture cleaning is organised, isolated, and controlled before the first diffuser comes down.
Cleaning Procedures for Common Commercial Fixtures
A dirty fixture does more than look neglected. It cuts light output, hides developing defects, and wastes labor when teams have to return for relamping, complaint response, or re-cleaning because the first pass was incomplete. The procedure has to fit the fixture, the finish, and the amount of soil on it.

Recessed troffers and LED panels
These fixtures are standard in offices, schools, clinics, and administrative areas. The usual problems are dust at the frame, film on the lens, insect debris inside the housing, and residue on reflective surfaces that reduces effective light distribution.
Use this sequence:
- Dry-remove loose dust first. Wipe frame edges, vents, and trim with a microfiber cloth or soft duster.
- Open or remove the lens with support under both sides. Diffusers crack when clips release unevenly or when one corner drops.
- Clean removable lenses separately. Wash with mild detergent, rinse fully, and dry completely in a protected area.
- Wipe interior non-electrical surfaces with a lint-free cloth. Keep liquid out of drivers, lampholders, wiring, and ballast compartments.
- Inspect before reassembly. Look for yellowed lenses, staining, loose fasteners, failed gaskets, and signs of heat damage.
The reinstallation check matters. A lens put back damp will spot immediately under illumination, and trapped moisture can shorten component life in enclosed fixtures.
Linear strips and utility fixtures
Strip fixtures in storage rooms, service corridors, maintenance shops, and warehouse areas usually carry heavier buildup on the top of the housing and inside lamp channels. Cleaning time goes up fast when dry dust is ignored and then mixed with water.
The efficient method is straightforward:
- Dust high surfaces before wiping lower ones. Soil from the top of the housing will drop into the channel if the order is reversed.
- Clean the exterior housing with a damp cloth and mild cleaner. Do not flood seams, sockets, or covers.
- Remove lamps only when access requires it. Set them on a stable, protected surface away from traffic.
- Wipe channels and end areas carefully. Insect remains and compacted dust often collect near ends and fasteners.
- Dry all contact points fully before closing the fixture. Moisture left at end caps or covers creates repeat call-backs.
In high-bay and overhead service areas, many facilities combine fixture cleaning with high dusting for overhead facility surfaces so lifts, floor control, and labor are used once instead of piecemeal.
Pendants, decorative glass, and lobby fixtures
These fixtures affect both presentation and visibility in entrances, conference spaces, and public areas. They also cost more to damage. Speed is not the priority here. Finish protection, part control, and streak-free drying are.
Start with dry dust removal. Clean non-electrical surfaces with a damp, not wet, cloth. Remove glass components when the design allows it, hand-wash them with mild detergent, and dry them completely before reinstallation. On multi-part fixtures, clean from top to bottom so upper arms, cups, and canopies do not drop dust onto finished surfaces below.
This short demonstration can help visualise the sequence before writing a site-specific SOP.
Specialty metal finishes and chandeliers
Specialty finishes need fixture-specific handling. Guidance for specialty finishes often recommends mild cleaners, soft cloths, and no abrasive pads because plated, brushed, patinated, or waxed surfaces can be permanently marked by aggressive scrubbing or the wrong chemical. For chandeliers, part tracking is just as important as cleaning. Crystals, pins, cups, and trim pieces need a controlled removal and reinstallation method so the fixture goes back together correctly and remains balanced.
In executive suites, hospitality spaces, and heritage interiors, surface damage usually costs more than the cleaning labor. The right procedure starts with identifying the finish, confirming approved materials, and assigning enough time to do the work without forcing the pace.
For handoffs between supervisors and cleaning crews, written task sheets reduce missed steps and inconsistent results. Facilities that are standardizing team procedures for busy professionals often document fixture type, access method, approved cloths and cleaners, drying requirements, and the defect checks required before power is restored.
Developing a Maintenance and Frequency Schedule
A lighting schedule fails in a predictable way. Offices near returns and entry doors haze over first. Warehouse aisles lose output slowly enough that complaints come late. By the time staff report a dark area, the facility has already been paying for light that is not reaching the work surface efficiently.
Set cleaning frequency by soil load, access difficulty, and business impact. A single interval for the whole building usually drives up labor in clean areas and lets dirt accumulate where visibility and output matter most. The schedule should match how the space operates, not how the fixtures look from the floor.
Build the schedule around environmental load
Start with inspection zones, not fixture names. Group fixtures by the conditions that drive buildup and the consequence of reduced light levels.
| Environment Type | Recommended Frequency | Considerations |
|---|
| Low-dust professional offices | Semiannual cleaning with documented inspections between services | Good fit for stable HVAC conditions and enclosed work areas with low particulate load |
| Boardrooms, reception, client-facing areas | Semiannual cleaning, plus appearance checks during routine janitorial rounds | Light loss here affects presentation standards and occupant perception faster than in back-of-house areas |
| Clinics, childcare centres, and busy shared spaces | Increased dusting and spot cleaning based on traffic, residue, and touchpoints | Higher occupancy and stricter hygiene expectations justify shorter inspection cycles |
| Warehouses and manufacturing floors | Frequent dust removal based on particulate generation and air movement | Forklift traffic, open dock doors, and process dust can reduce output quickly and increase relamping complaints |
| Utility rooms and back-of-house corridors | Scheduled from inspection findings and service-call history | These spaces are often missed, even though poor visibility can raise safety risk during maintenance tasks |
This approach controls cost better than blanket scheduling. Clean low-load areas on a longer cycle and direct labor to zones where dirt cuts light output, affects safety, or increases complaints.
Use inspection triggers, not appearance alone
A workable schedule includes clear triggers for early service. Dirt buildup often starts inside diffusers, on upper housing surfaces, or in tall-bay fixtures where floor-level checks miss the problem.
Use these triggers to move a fixture or zone ahead in the queue:
- Uneven brightness in an occupied area: The lamps still operate, but the space reads darker or patchy.
- Visible film or dust on lenses and reflectors: Light transmission is already being reduced.
- Seasonal spikes in airborne particles: Pollen, construction dust, smoke residue, or extended open-door periods change the cleaning need.
- Insect accumulation in enclosed fixtures: Common near loading areas, entrances, and perimeter rooms.
- Access opportunity: If a lift is already on site for ceiling, HVAC, or signage work, bundle fixture cleaning to lower access cost per task.
Document labor, access, and compliance windows
The schedule should live in the maintenance plan, not in a supervisor's memory. Record fixture zone, height, access method, lockout requirements, estimated labor hours, and the inspection standard for acceptable cleanliness. That gives the team a repeatable work order and gives management a basis for budget decisions.
For office environments that already coordinate janitorial and periodic detail work through commercial office cleaning services, fixture inspections can be added to existing walk-throughs so problems are found before they turn into lighting complaints or safety issues.
Sites with limited internal labor sometimes review support models such as Forge Reliability's outsourcing services when access equipment, documentation, or recurring high-bay work starts consuming too much maintenance time.
A defensible schedule ties frequency to conditions on site, tracks exceptions, and adjusts after inspection results. That protects light levels, reduces wasted labor, and supports safer occupied spaces.
Evaluating In-House vs Professional Cleaning Services
A missed fixture cleaning cycle rarely shows up as a line item. It shows up in labor drag, avoidable access costs, lighting complaints, and poor visibility in occupied areas. The right decision is the one that keeps light levels up, controls risk, and uses maintenance hours where they return the most value.
In-house crews are a good fit when the fixture inventory is standard, access is straightforward, and the team already works under a defined electrical and ladder safety procedure. Contract support is usually the better choice when the site has high ceilings, multiple fixture types, strict documentation requirements, or after-hours cleaning windows that would pull internal staff away from core maintenance work.

Decision criteria that matter
The first test is cost control, not hourly rate alone.
Labor and equipment
An internal team may already be on payroll, but fixture cleaning still consumes scheduled labor, supervision time, PPE, access equipment, and reinspection effort. If the work requires a lift, traffic control, or off-shift access, the internal option can become more expensive than it looks on paper. The accurate comparison is total task cost per completed fixture or zone.
Risk and liability
Cleaning overhead electrical fixtures raises the standard for planning and execution. Any gap in lockout practice, ladder use, lift operation, or protection of occupied areas increases exposure. For teams reviewing broader support models, Forge Reliability's outsourcing services show how facilities often assign specialized work when reliability, documentation, and controlled execution matter more than keeping every task in-house.
Quality control
A maintenance team knows the building, which is an advantage. It does not automatically mean the team has the right method for acrylic lenses, decorative finishes, enclosed high-bay fixtures, or residue removal without scratching surfaces. Poor cleaning technique reduces light output, creates callbacks, and can damage parts that cost more to replace than the cleaning itself.
Service scope
Some buildings only need periodic low-level fixture cleaning tied to routine janitorial support. Others need fixture cleaning bundled with ceiling dust removal, access planning, and after-hours occupancy control. In those cases, it makes sense to coordinate the work through commercial office cleaning services for occupied facilities so the scope, access window, and reporting sit under one plan.
What to ask a professional cleaning provider
Before issuing a work order, confirm the operating details in writing:
- Which fixture types are included: Standard troffers only, or pendants, decorative housings, high-bay units, and specialty finishes as well?
- How power isolation is handled: Who verifies de-energization, and who is responsible for access to panels or controls?
- What access method is planned: Step ladder, extension tools, scaffold, or lift, and who supplies that equipment?
- Which cleaning products are approved: Are they suitable for lenses, reflectors, painted housings, and metal trim without causing haze or finish damage?
- What documentation is returned: Service logs, deficiency notes, fixture counts, area completion records, or exception reports.
- What is excluded from scope: Lamp replacement, driver or ballast issues, cracked lenses, parts procurement, and lift rental should be stated before work starts.
- How the crew will protect operations: Can the work be done after hours or in controlled sections so occupants, production, or office staff are not disrupted?
What to avoid
Avoid providers that describe the work as a general wipe-down. That is not a cleaning standard.
Other warning signs are just as clear:
- No fixture-specific method: Different materials require different handling.
- No written scope: Missed areas and billing disputes usually follow.
- No process for defect reporting: Cleaning crews often find cracked lenses, loose trim, and failed components before anyone else does.
- No plan for access and area control: Overhead work without a defined access and barricade method creates unnecessary risk.
Maintenance Tools Printable Checklist and Further Reading
A fixture cleaning program holds up only if the paperwork holds up. Without a usable checklist, teams miss isolation checks, skip defect notes, and lose the maintenance history that supports scheduling, budgeting, and liability control. Clean fixtures improve light output, but the recordkeeping is what turns the task into a repeatable maintenance standard.
A good worksheet should be short enough for crews to use in the field and specific enough for supervisors to audit later. It should show what was cleaned, how access was handled, whether power was isolated, what defects were found, and whether the fixture was returned to service in acceptable condition. If that information is missing, the facility cannot prove the work standard or track repeat problems in the same area.
Printable checklist items to include
Include these items on the form:
- Fixture identification: Room, zone, line area, or asset tag
- Date and technician name: Who performed the work and when
- Access method: Step ladder, extension tool, scaffold, or lift
- Power isolation confirmation: Breaker, switch leg, lockout point, or control point
- Fixture type: Troffer, wrap, downlight, pendant, high-bay, or specialty unit
- Cleaning method used: Dry dusting, damp wipe, lens removal and wash, or finish-specific process
- Approved materials used: Cloth, detergent, cleaner, gloves, and replacement hardware if applicable
- Drying verification: Confirm lenses, trim, and internal surfaces were dry before reassembly
- Defect notes: Cracked lenses, loose trim, failed lamps, insect buildup, staining, corrosion, or damaged finish
- Post-cleaning check: Fixture secure, light operating, area cleared, and debris removed
- Sign-off: Technician sign-off and supervisor review if required
Keep the form printable. Crews working from ladders or lifts do better with a one-page document than a long digital checklist that slows the job.
Further reading
Internal resources:
FAQ
What's the safest first step in light fixture cleaning
Confirm the fixture can be isolated safely, then shut off power before touching covers, lamps, lenses, or internal parts.
How often should commercial light fixtures be cleaned
Set frequency by dust load, fixture type, ceiling height, and occupancy conditions. Standard office areas may support a periodic schedule, while production, warehouse, food service, and entry areas usually need more frequent attention.
Can all fixtures be cleaned with the same product
No. Lens material, finish type, and fixture construction determine what can be used without causing haze, scratching, discoloration, or coating damage.
Should facility teams clean based on appearance alone
No. Use inspection records, lighting complaints, environmental conditions, and preventive maintenance intervals. A fixture can be underperforming before it looks dirty from floor level.
Who should handle high or hard-to-reach fixtures
Assign that work only to personnel with the right access equipment, training, and area control procedures. If safe access is not available, schedule a qualified service provider.
What causes repeated dimness after relamping
Dirt on lenses, reflectors, and internal surfaces is a common cause. The fixture may have a maintenance issue as well, so the condition should be documented during inspection.
For facilities that want a documented cleaning scope rather than an ad hoc ceiling task, Arelli Cleaning is one option to include when gathering quotes. Use the checklist above, define fixture types and access conditions clearly, and compare providers against the same written scope.


.webp)